The final production came out brilliantly, I feel it is simple but that is what we need as people have a limited time to take it in. The video starts with curtains similar to what would be seen on the stage, reflecting its distant past. It then asks if the driver wants a good time and some "E's" all in slang language and using smilies. This reflects its most present usage. Next it goes on to show an RSS feed from the www.thisisplymouth.co.uk website, which will show any article which has the theme of the Dance Academy on the screen, 95% of which are about the drug bust and uncertain future of the Dance Academy, this would of course be updated automatically if there is a new story about the building.
One problem I did have with the presentation was the lack of colour and also the speed the stories go at, but this is because there are so many to show in such little time and the observer can make out enough to know what it is about. I suppose this also gives the factor of wanting to return to try and read the parts you missed but it would have been better if it was a little bit slower IMO.
Overall I think it was a great success and our group worked together really well! =]
Some pictures of us working with Arduino, we got started quite slowly with the coding of Arduino, but we've had a strong idea for some time, we have just been perfecting it! Now we need to turn that idea into a reality...
First thing was to get our hands on an Arduino board along with some adapter shields and sensors, we had a fiddle in one session and coded a nifty little light sensor linked up a LDR sensor. This was actually fundamental to our project as it is reliant on recognising whether the sensor is seeing light or not. When the code changed from 0 to 1 (i.e no light to light) the light went from on to off! This means a big chunk of our project is ready to go, we just need to get working on the fartotrom!
We now need to link it up to the fart machine, the machine will still fart but will also play a quicktime video when the sensor is exposed to light. This reflects the exposure to light it will receive when the light changes to red. The time the cars will be stopped and people will have nothing to look at but the projection.
Here is a picture of the complex set of Arduinos, shields and sensors to make a light sensor. Jon perfecting the code!
This project, found on YouTube shows how to turn an Arduino micro-controller into sensor of invisible electromagnetic fields using simple wire, a resistor, and an LED.
Aaron ALAI's EMF detector project is awesomely simple to make and fun to use. An upgraded version can be built using an LED bar-graph for more 'meter-like' functionality.
This project is really really cool and would be a great way for someone to find where they are wasting electricity in their house in a fun and easy way. This doesn't really relate to our Stonehouse project but goes to show the possibilities of Arduino are really wide ranging. I might even give this a go in my own time when the project is completed!
The Code...
As you can see the code is really simple to do as well, showing how accessable arduino is to anyone with a little bit of knowledge... compared to say... JAVA! -.-
EMF Detector Averaging Code // Aaron ALAI EMF Detector May 28th 2009 VERSION 1.1 // aaronalai1@gmail.com // contains code for averaging sensor data
#define sample 300 //this is how many samples the device takes per reading //more information for #define http://arduino.cc/en/Reference/Define int inPin = 5; //analog 5 float val; //where to store info from analog 5 int pin11 = 11; //output of red led
int array1[sample]; //creates an array with number of elements equal to "sample" //more information about arrays http://arduino.cc/en/Reference/Array
unsigned long averaging; //the program uses this variable to store the sum of each array it makes
void setup() {
Serial.begin(9600);
}
void loop() {
for(int i = 0; i < averaging =" averaging" val =" averaging" val =" constrain(val," val =" map(val," averaging =" 0;" inpin =" 5;" pin11 =" 11;" i =" 0;" averaging =" averaging" val =" averaging" val =" constrain(val," val =" map(val," averaging =" 0;" inpin =" 5;" pin11 =" 11;" i =" 0;" averaging =" averaging" val =" averaging" val =" constrain(val," val =" map(val," averaging =" 0;"
Instead of chaining multiple guitar effects in search of a new sound, the maker of this video decided to mod just one. Using an Arduino microcontroller board + digi-pot chip, he was able to add a variable gating effect to a fuzz pedal.
This helicopter game is made using arduino, and is similar to the popular copter game online, the refresh rate is a bit slow but the game is simple and engaging.
/** * Helicopter Game v0.1 * By Dave de Fijter * Free to use and abuse :) * * Uses the ks0108 library from the arduino playground: * http://www.arduino.cc/playground/Code/GLCDks0108 */
int position = 5; // Initial y-position of the helicopter unsigned int screenwidth = 128; // The width of the screen in pixels (duh) unsigned int screenheight = 64; // The height of the screen in pixels (duh) unsigned int playerwidth = 10; // The width of the helicopter sprite unsigned int playerheight = 5; // The height of the helicopter sprite unsigned int max_position; // The maximum y-position of the helicopter unsigned int buttonPin = 12; // The arduino pin number of the play-button unsigned long xpos = 1; // The x-position of the helicopter ;) unsigned int iters = 0; // Block iterations, also represents your score boolean running = true; // Flag that marks if the game is running or not unsigned int ry; // The y location of the current block to avoid unsigned int minblock = 19; // Minimum size unsigned int blocksize = 19; // The startsize of the blocks unsigned int maxblock = 30; // The maximum size of a block; increase for more difficulty
void setup() {
// Reset the defaults because we wan't te reset the game after a game over running = true; xpos = 1; iters = 0; position = 5; blocksize = 19;
// If the button is hold invert the screen, otherwise play it like it's normal pinMode(buttonPin, INPUT); if(digitalRead(buttonPin) == LOW) { GLCD.Init(INVERTED); } else { GLCD.Init(NON_INVERTED); } GLCD.ClearScreen();
// Calculate the maximum y position of the helicopter max_position = screenheight - playerheight - 2; // Show the introduction screen intro(); // Seed the random generator from the unused analog 5 input (noise) randomSeed(analogRead(5)); }
void intro() { // Draw the introtext and wait for a second before starting the game GLCD.ClearScreen(); GLCD.SelectFont(Arial_14); GLCD.GotoXY(40, 26); GLCD.Puts("HeliGame"); delay(1000); GLCD.ClearScreen(); DrawScene(); }
void DrawPlayer(int y) { // Remove the last helicopter and draw a new one on the given y position :)
GLCD.FillRect(0, position, 10, 5, WHITE); // Clear the last heli GLCD.DrawLine(1, y, 8, y, BLACK); // X,Y,X,Y, BLACK if(xpos % 3 == 0) { GLCD.SetDot(2, y, WHITE); GLCD.SetDot(4, y, WHITE); GLCD.SetDot(6, y, WHITE); } GLCD.SetDot(5, y + 1, BLACK); GLCD.SetDot(1, y + 2, BLACK); GLCD.DrawLine(4, y + 2, 7, y + 2, BLACK); GLCD.DrawLine(1, y + 3, 4, y + 3, BLACK); GLCD.SetDot(8, y + 3, BLACK); GLCD.DrawLine(4, y + 4, 7, y + 4, BLACK); position = y; }
void GameOver() { // Shop this screen when it's a "Game Over" // Delay for a sec after that so the reset won't get triggered by accident // After that second the game can be reset // Hold the button for a while for "night" modus ;) GLCD.ClearScreen(); delay(10); GLCD.SelectFont(Arial_14); GLCD.GotoXY(32, 26); GLCD.Puts("Game Over"); GLCD.SelectFont(System5x7); GLCD.GotoXY(58, 40); GLCD.PrintNumber(iters); running = false; delay(1000); }
void Blocks(int x) { // Draw the blocks to avoid; // Sorry, only one at a time ;) if(x / screenwidth > 0) { if(x % screenwidth == 0) { //GLCD.ClearScreen(); GLCD.FillRect(0, 1, screenwidth -1, screenheight - 3, WHITE); ry = random(1, screenheight - (blocksize + 2)); iters++; } int rt = screenwidth - (x % screenwidth) - 10; int rto = screenwidth - (xpos % screenwidth) - 10; if(rto >= 0) { GLCD.FillRect(rto, ry, 9, blocksize, WHITE); } if(rt >= 0) { GLCD.FillRect(rt, ry, 9, blocksize, BLACK); }
if(rt <>= ry && position <= (ry + blocksize)) { // collide GameOver(); } } } xpos = x; } void DrawScene() { // Draw the initial scenery GLCD.DrawLine(0, 0, screenwidth - 1, 0, BLACK); GLCD.DrawLine(0, screenheight - 1, screenwidth - 1, screenheight - 1, BLACK); GLCD.SelectFont(System5x7); } void loop() { // Game code; run the main loop if the game is running; // Otherwise check the button state for a game reset if(running) { if(digitalRead(buttonPin) == LOW) { // Go Up DrawPlayer(position - 1); } else { // Go Down DrawPlayer(position + 1); } GLCD.FillRect(100, 4, 26, 7, WHITE); GLCD.GotoXY(100, 4); GLCD.PrintNumber(iters); Blocks(xpos + 1); // Check for status if(position <> max_position) { GameOver(); }
Now we have been shown arduino and what we can do with it we are defiantly looking into using the Stonehouse work we have been working on all first term but just implementing it in different ways to make use of the arduino boards. We are still looking to have a projection but are now looking more towards projecting it onto the road as our previous research showed that this would probably have the most impact and be viewed by the most people. Therefore we are looking into different ways to project it.
One idea we have is to use sound, every the arduino board is triggered by a certain amount of DB a projection would be started, to do this we could use Arduino to build a audio sensor similar to the one shown HERE the problem with thisis that the sound could be caused by other things, such as birds, or music from the clubs on Union Street, sound also means the car is passing so the animation will put off the drivers and we could be in trouble with the police!
For this idea I had a look at some code and what Aduino boards we needed.
The brick consists of a high sensitivity microphone and onboard Low Voltage Audio Power Amplifier. These measure the amplitude of sound in the environment. This data can then be used to start the effects on the screen, so in my case the storm starting on the screen.
The code for this would be very simple, it would just be a matter of telling the Arduino sensor that when the audio level reaches a certain level (eg 10DB so that normal ambient sounds do not effect the game) the animation starts.
I have written up a code for a device to display sound levels with Arduino but not to do anything with them, this would be the part I'd need with the device.
void serialEvent(Serial myPort) { // read the serial buffer: String myString = myPort.readStringUntil(linefeed);
// if you got any bytes other than the linefeed: if (myString != null) {
myString = trim(myString); //println(myString); // split the string at the commas // and convert the sections into integers: int sensors[] = int(split(myString, ‘,’));
// print out the values you got: for (int sensorNum = 0; sensorNum < sensors.length; sensorNum++) { //print(“Sensor ” + sensorNum + “: ” + sensors[sensorNum] + “\n”);
void keyPressed(){ if(key==’s’) saveFrame(“sound-######.png”); } //------------ end of code
Therefore we are now looking into the idea of using light sensors on the traffic lights, which when they turn red turn a switch (eg a 0 to a 1) and starts the video, the problem with this is that wireless receivers for Arduino are quite expensive, we are therefore looking into some solutions to this.
*Update*
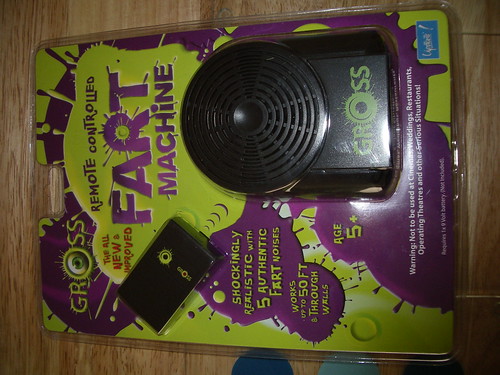
Jon has come up with a great idea of using a fart machine as a wireless sensor, with a range of over 50 ft it would be perfect, whilst we were in NYC Jon started work with the machine, testing the range of it as a light sensor, now we just need to link that to the video somehow!
personally my favorite is this RRS link which could be used in some way in the video, and be updated if there is any news about the club automatically. We'd just need to find a way to make it automatically update
So finally after so much talk about them we are finally going to be playing about with Arduino Boards
"Arduino is an open-source electronics prototyping platform based on flexible, easy-to-use hardware and software. It's intended for artists, designers, hobbyists, and anyone interested in creating interactive objects or environments.
Arduino can sense the environment by receiving input from a variety of sensors and can affect its surroundings by controlling lights, motors, and other actuators. The microcontroller on the board is programmed using the Arduino programming language (based on Wiring) and the Arduino development environment (based on Processing). Arduino projects can be stand-alone or they can communicate with software on running on a computer (e.g. Flash, Processing, MaxMSP).
The boards can be built by hand or purchased preassembled; the software can be downloaded for free. The hardware reference designs (CAD files) are available under an open-source license, you are free to adapt them to your needs.
Arduino received an Honorary Mention in the Digital Communities section of the 2006 Ars Electronica Prix. The Arduino team is: Massimo Banzi, David Cuartielles, Tom Igoe, Gianluca Martino, and David Mellis." - Arduino
We had a look at this tutorial:
http://www.arduino.cc/en/Tutorial/PhysicalPixel
After our first look at Arduino I feel this technology would help our project greatly, we had a lot of ideas for our visual aspects but not how to make transitions, with Arduino we can use the traffic lights changing as the cue for the change. We are thinking of doing this by using an Arduino board with a light sensor to do this, every time the lights change red the animation begins.
Another way that was suggested was to use a wireless mouse and instead of a click action on the left mouse button we will use a light sensor. Every time the light turns red the mouse “clicks” a play button that starts the animation. Whilst this is good in theory as the use of a wireless mouse would mean we’d need the sensor near to the computer that gets clicked which probably isn’t viable.One way to get around this would be to use a wired mouse with extensions, the problem with this is that they could get disconnected or cut by passers or be effected by the weather by which would end the project.
The following video shows an interactive installation that creates a cool real time interactive projection on a huge scale, the maker of this project said that they aimed to "create an installation that would go beyond merely projection on buildings and allow viewers to become performers, by taking their body movements and amplifying them 5 stories tall." The idea of tracking peoples movement and projecting them is something that is very interesting, I don't think it would really work in Stonehouse as the main traffic through the area is cars not people but in a pedestrianised area such as Cornwall Street or the University this could work very well. A good place this could be projected is either the Council building in the town centre or one of the university buildings.